S3 hark - Site Response 1
Introduction
One-dimensional (1-D) site response analysis is a geotechnical engineering method used to evaluate how seismic waves propagate through soil layers from bedrock to the ground surface. This type of analysis is crucial for understanding the local effects of an earthquake on a particular site, enabling engineers to design structures that can better withstand seismic events. The primary goal of 1-D site response analysis is to predict how different soil layers will affect the amplitude, frequency content, and duration of seismic ground motions.
Problem Description
On this problem, we will perform a site response analysis on an specfic location subjected to a seven different earthquakes in order to analyze the propagation of seismic waves through soil and obtain the ground surface response. The ground surface response is typically the major output from these analyses, along with profile plots such as peak horizontal acceleration along the soil profile.
In cases where liquefiable soils are present, maximum shear strain and excess pore pressure ratio plots are also important.
In the figure below, we can observe a representation of the one-dimensional response analyses, which assume that all boundaries are horizontal and that the response of a soil deposit is predominately caused by SH-waves propagating vertically from the underlying bedrock.
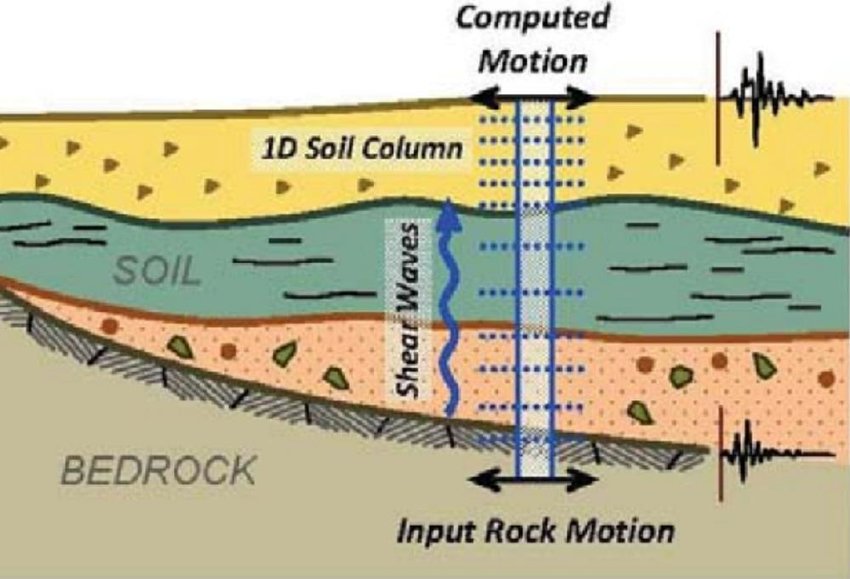
Figure 1. One-dimensional response analyses
Solution Strategy
For this example it will be implement the Site-Specific Seismic Hazard Analysis and Research Kit (S3 HARK) tool, which focuses on simulating wave propagation along soil depth using finite element (FE) method, to perform site-specific analysis of soil in response to earthquakes. This tool provides multiple nonlinear material models for simulating the soil behavior under earthquake loading, The available constitutive models are listed below:
* ElasticIsotropic (Elastic).
* PM4Sand.
* PM4Silt.
* PressureIndependendeMultiYield (PIMY).
* PressureDependMultiYield (PDMY).
* PressureDependMultiYield02 (PDMY02).
* Mazari Dafalias.
* J2CyclicBoundingSurface (J2Bounding).
For the porpuse of this example we will implement and provide basic definitions for two of these constitutive models:
PM4Sand Model: this constitutive model is developed to simulate the behavior of sandy soils under various loading conditions, especially during seismic events. It is specifically designed to capture the cyclic and dynamic behavior of sands, including the phenomena of liquefaction and cyclic mobility.
Note
What is Liquefaction?
Liquefaction occurs when seismic waves induce cyclic loading in saturated, loose, sandy soils, causing the soil grains to rearrange and densify. This rearrangement increases the pore water pressure within the soil, reducing the effective stress and consequently the soil’s shear strength. When the pore pressure approaches the overburden pressure, the soil behaves like a liquid, losing its ability to support loads.
ElasticIsotropic Model: Often referred to simply as the Elastic model, this is one of the simplest constitutive models used in geotechnical and structural engineering. It is based on the assumption that the material behaves elastically and isotropically, meaning that the material’s properties are the same in all directions and that it returns to its original shape upon unloading
SimCenter Tool Used
Click on the icon of s3 hark to open the application.
Figure 3. S3 hark executable icon.
Operations Area: In the upper toolbar, you can see three options (Figure 4.):
In Height, you can choose the depth of your soil column.
In GWT, you can choose the depth of the groundwater table of your specific site.
In Total layer, you can modify the number of soil layers on your specific site. Click the “+” button to add a soil layer (a layer will be added below the selected layer) and the “-” button to delete a selected soil layer. Click several times to add more layers.
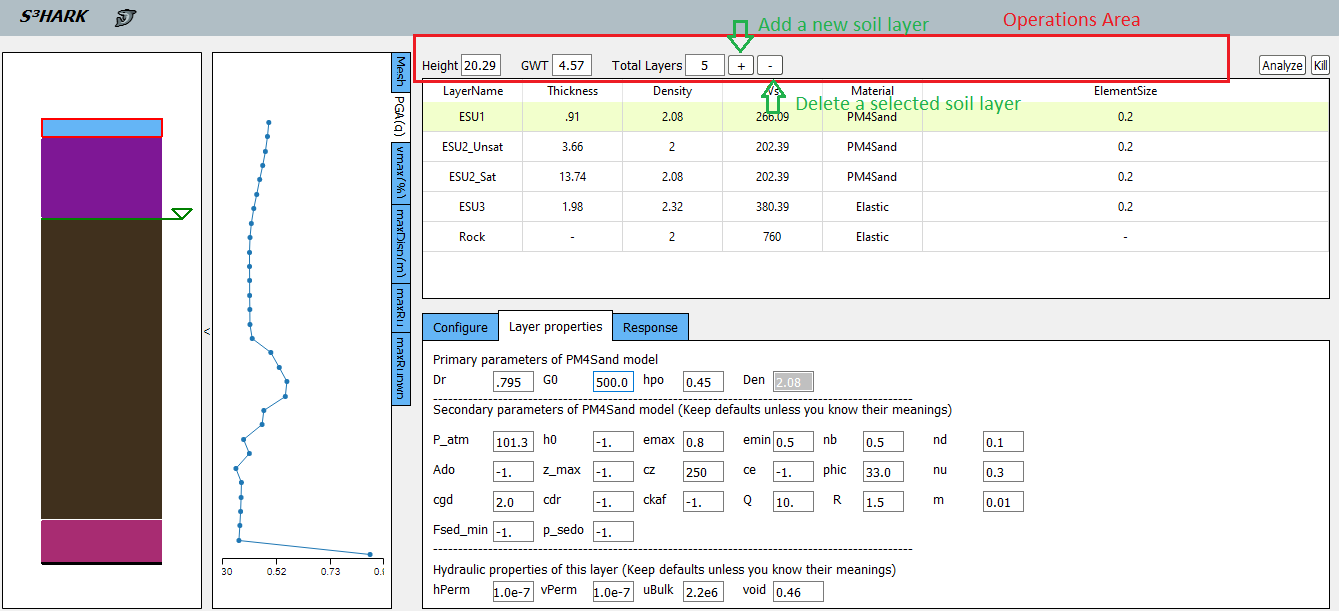
Figure 4. Main window - Operations area
Soil Layer Table: In this table the user provides the characteristics of each soil layer, such as layer thickness, density, Vs, material type, and element size in the finite element mesh (Figure 5.).
Note
Variables are assumed to have m, kPa, and kN units in the Site Response panel.
Soil Column Graphic: The first graphic on the left of the panel shows a visualization of the soil column (Figure 5.).
Finite Element Mesh Graphic: The second graphic on the left shows the finite element mesh (Figure 5.).
Configure Tab: This section shows the configuration options (Figure 5.).
Under the “OpenSees” label, type the path of OpenSees executable. You can also select the executable from your local computer by clicking on the “+” button on the right of the input area.
Under the “Rock motion” label, type the path of a ground motion file. You can also select the file from your local computer by clicking on the “+” button on the right of the input area.
Under the “Slope parameters” label, we can modify the degree of inclination of our study terrain if this were the case.
Note
The rock motion file must follow the SimCenter event format.
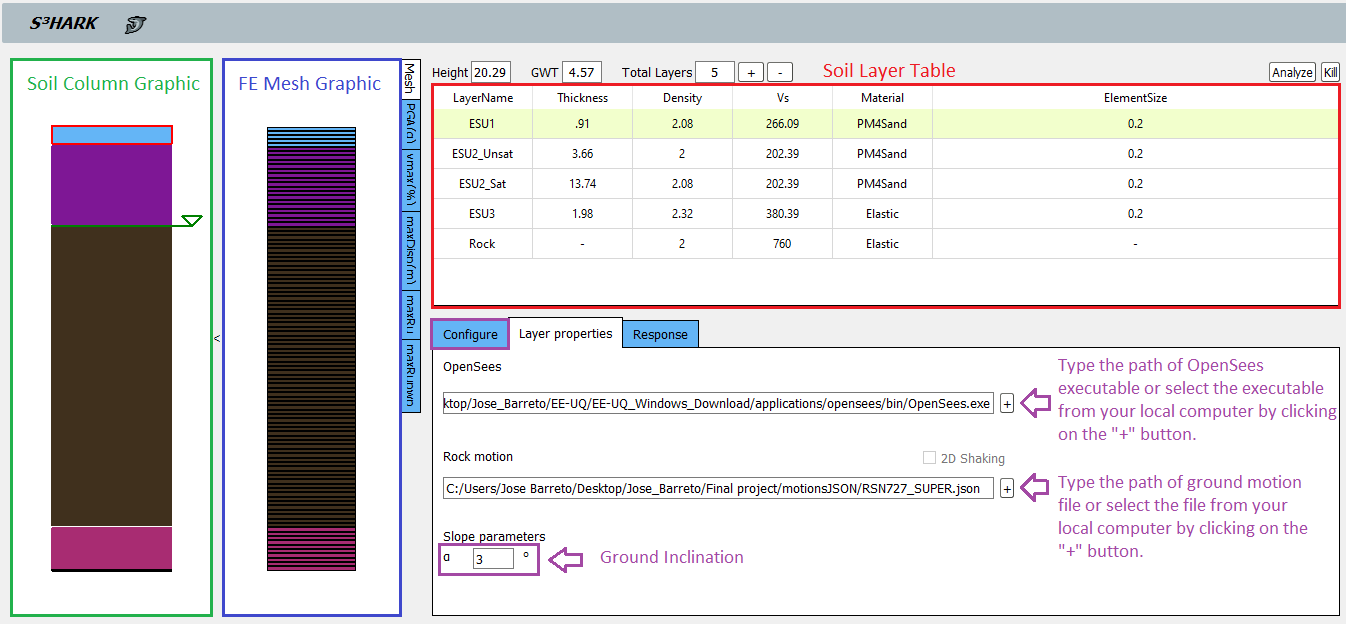
Figure 5. Main window - Soil layer table, graphics and configure tab.
Layer Properties Tab: This tab allows the user to enter additional material properties for the selected soil layer (Figure 6.).
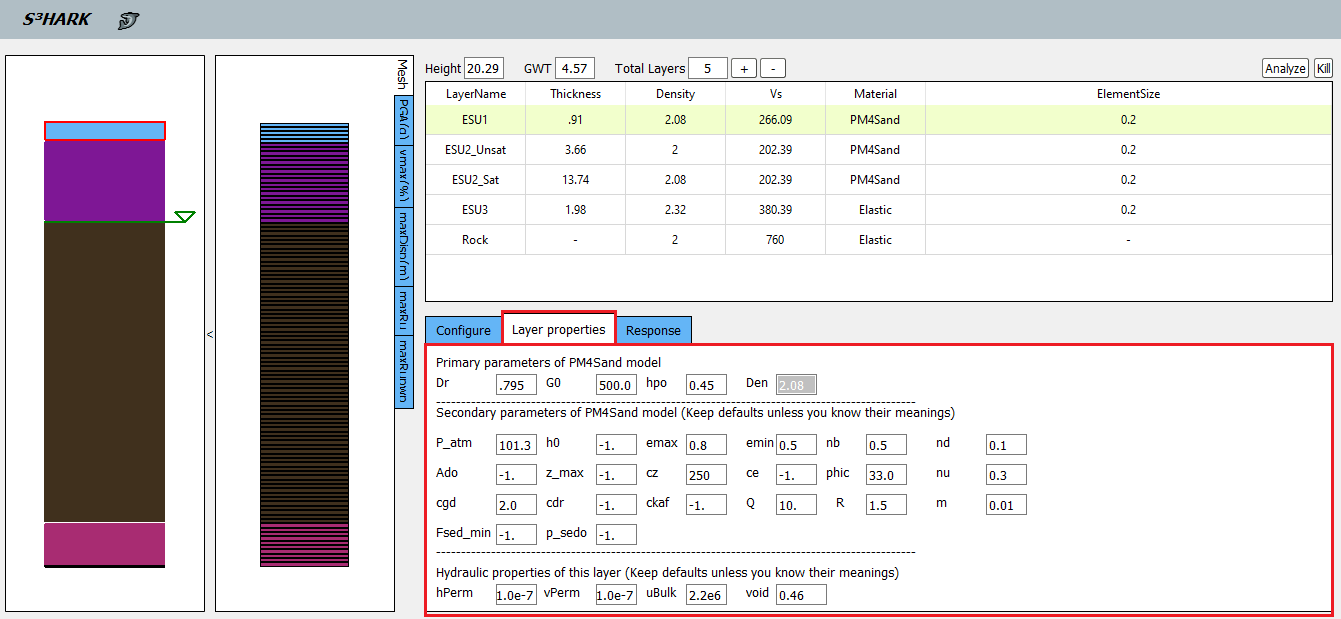
Figure 6. Main window - Layer properties tab.
Response Tab: Once the site response analysis has been performed, this tab provides information about element and nodal time varying response quantities (Figure 7.).
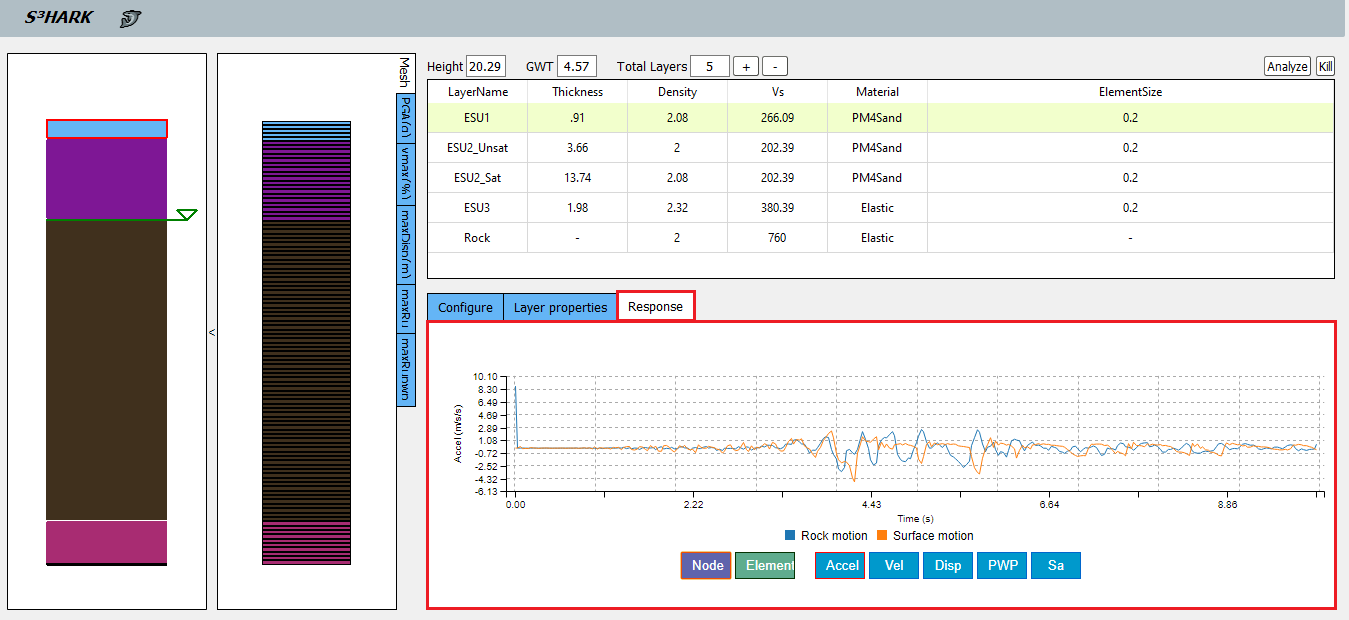
Figure 7. Main window - Response tab.
Click the “Analyze” button on the right side of the upper toolbar to run the finite element analysis.
You will see a progress bar displayed at the bottom of the right hand side of the app, which shows the percentage of steps perfomed (Figure 8.).
Once the simulation is done, the “Response” tab and the “PGA” profile plot will be displayed. At the same time, a pop up window showing “The analysis is done” will show up. And when you click “I know”, the progress bar will disappear (Figure 8.).
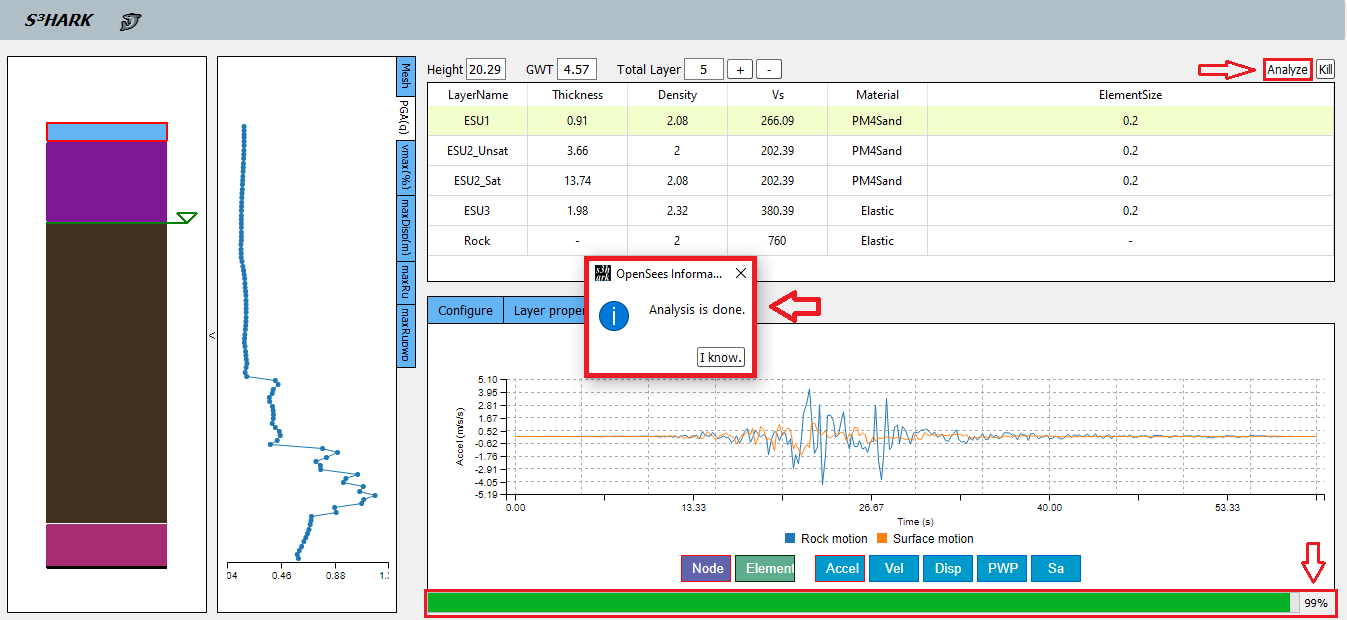
Figure 8. Main window - Analyze Done.
You can see the profile plots of the PGA, γmax , maximum displacement and maximum ru by clicking on the respective tabs on the right side of the Finite Element Mesh Graphic and the surface and ground motion by clicking the Response tab (Figure 8.).
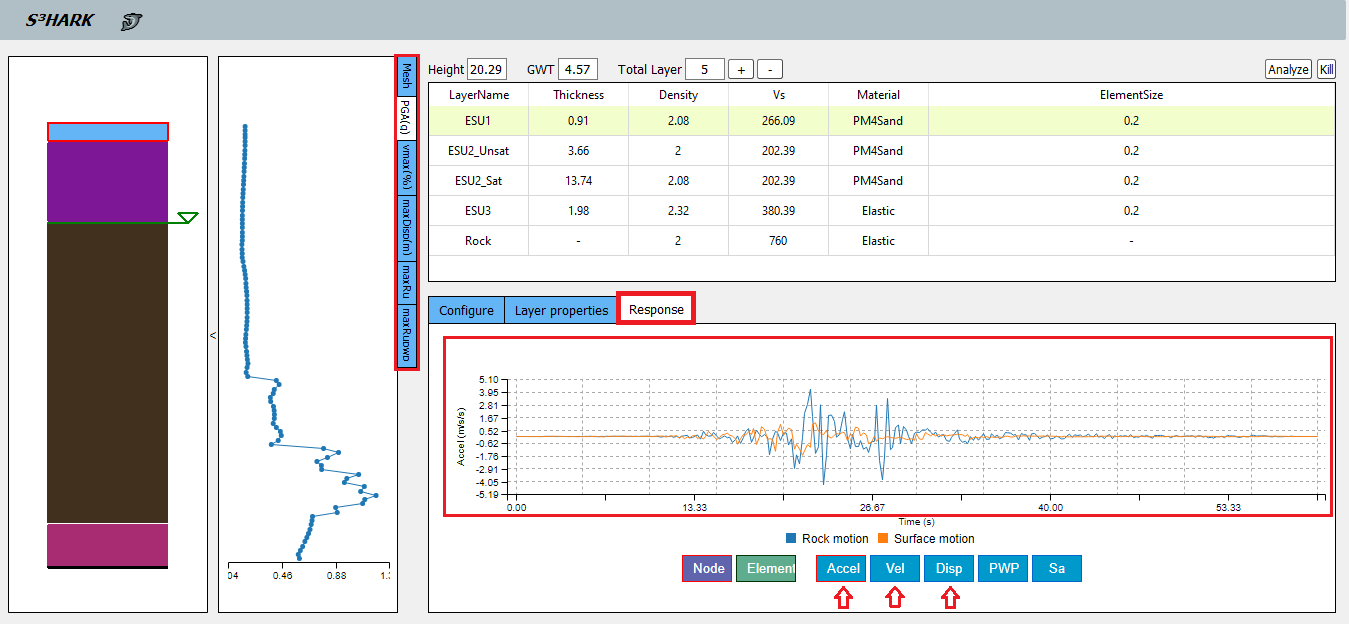
Figure 9. Main window - Results.
Example Application
Soil Condition
The soil column being analyzed is a 20.29 meters high sitting on rock. The ground water table is at 4.57 meters below the soil surface. In the column, there are a total of three layers. Each layer is meshed by elements with size of 0.20 meter in height. The soil profile is shown in Figure 10. and basic properties of soil layers are shown in Table 1. The first two layers are modeled by PM4Sand and the third layer is modeled by elastic isotropic material.
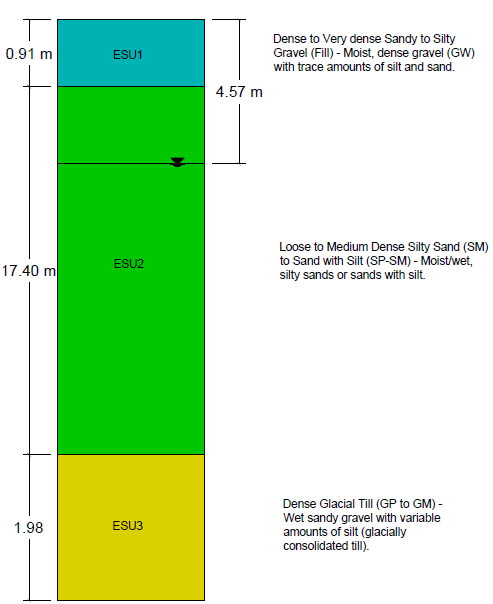
Figure 10. Soil profile representation
Layers |
Thickness (m) |
Vs (m/s) |
ρunsat (kg/m3) |
ρsat (kg/m3) |
Go,ref (MPa) |
DR (%) |
hpo |
v |
E50,ref (kPa) |
|---|---|---|---|---|---|---|---|---|---|
ESU1 |
0.91 |
266.09 |
2.08 |
2.16 |
335.16 |
79.50 |
0.52 |
0.3 |
167580.91 |
ESU2 |
17.4 |
202.39 |
2.00 |
2.08 |
76.61 |
39.67 |
0.52 |
0.32 |
14364.08 |
ESU3 |
1.98 |
380.39 |
2.24 |
2.32 |
316.01 |
85.98 |
0.25 |
153216.83 |
Earthquake Condition
Information on the seven ground motions to be used in this example is shown in Table 2, and in Figure 11, you can see the response spectrum of the 7 earthquakes in a single graph.
Motion |
PGA (g) |
dT (sec) |
Duration (sec) |
N° of steps |
|---|---|---|---|---|
Conception-L |
0.82 |
0.01 |
141.67 |
28335.00 |
RSN727_SUPER |
0.96 |
0.01 |
22.20 |
2221.00 |
Tohoku 41207-EW |
0.58 |
0.01 |
359.98 |
35999.00 |
Tohoku Ishinomaki-NS |
0.77 |
0.01 |
299.98 |
29999.00 |
RSN803_LOMAP_WVC270 |
0.67 |
0.01 |
39.98 |
7998.00 |
RSN4457_MONTENE |
0.68 |
0.01 |
40.39 |
4040.00 |
RSN6911_DARFIELD_HORCN18E |
0.61 |
0.01 |
60.17 |
12036.00 |
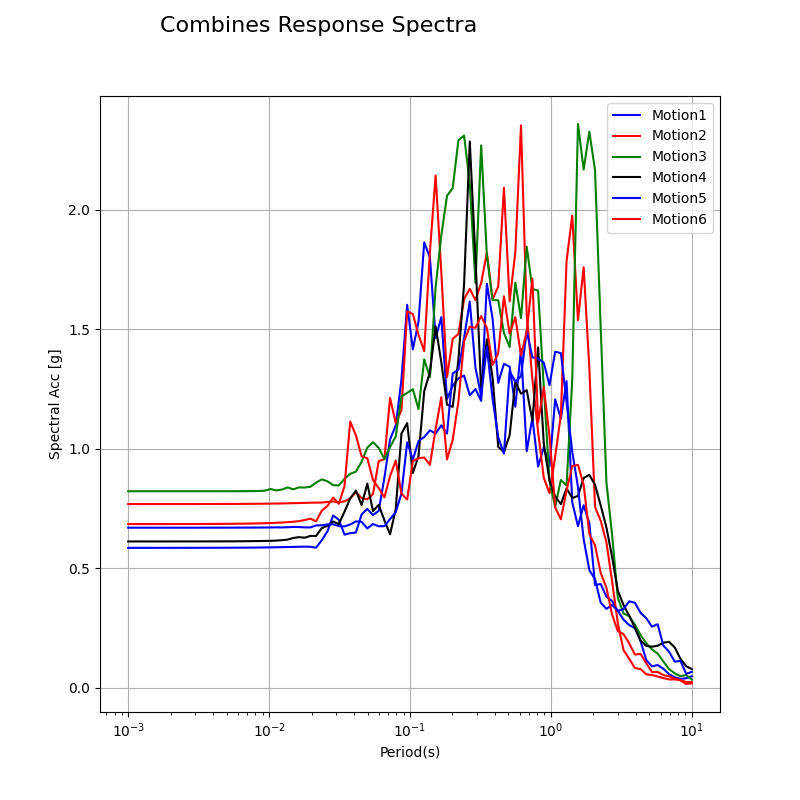
Figure 11. Response spectrum.
The rock motions, in SimCenter format, can be downloaded from the rock motions folder (this can be found in the GitHub Repository).
Results
The following table shows the peak ground acceleration (PGA) and peak ground velocity (PGV) in the bedrock and on the ground surface corresponding to each of the seven earthquakes obtained from S3 HARK.
PGA (m/s2) |
PGA (m/s2) |
PGV (m/s) |
PGV (m/s) |
|
|---|---|---|---|---|
Motion |
Rock |
Surface |
Rock |
Surface |
Conception-L |
8.00 |
1.52 |
1.28 |
0.56 |
RSN727_SUPER |
7.85 |
1.71 |
0.47 |
0.29 |
Tohoku 41207-EW |
5.59 |
1.44 |
0.61 |
0.53 |
Tohoku Ishinomaki-NS |
7.09 |
1.76 |
9.26 |
4.62 |
RSN803_LOMAP_WVC270 |
5.96 |
1.64 |
1.27 |
0.76 |
RSN4457_MONTENE |
6.47 |
1.93 |
0.80 |
0.86 |
RSN6911_DARFIELD_HORCN18E |
5.84 |
1.69 |
1.4 |
1.07 |
The below images present the PGA, maximum shear strain, maximum displacement, maximum excess pore pressure ratio, ground surface response and rock motions results obtained from S3 HARK.
Peak Ground Acceleration
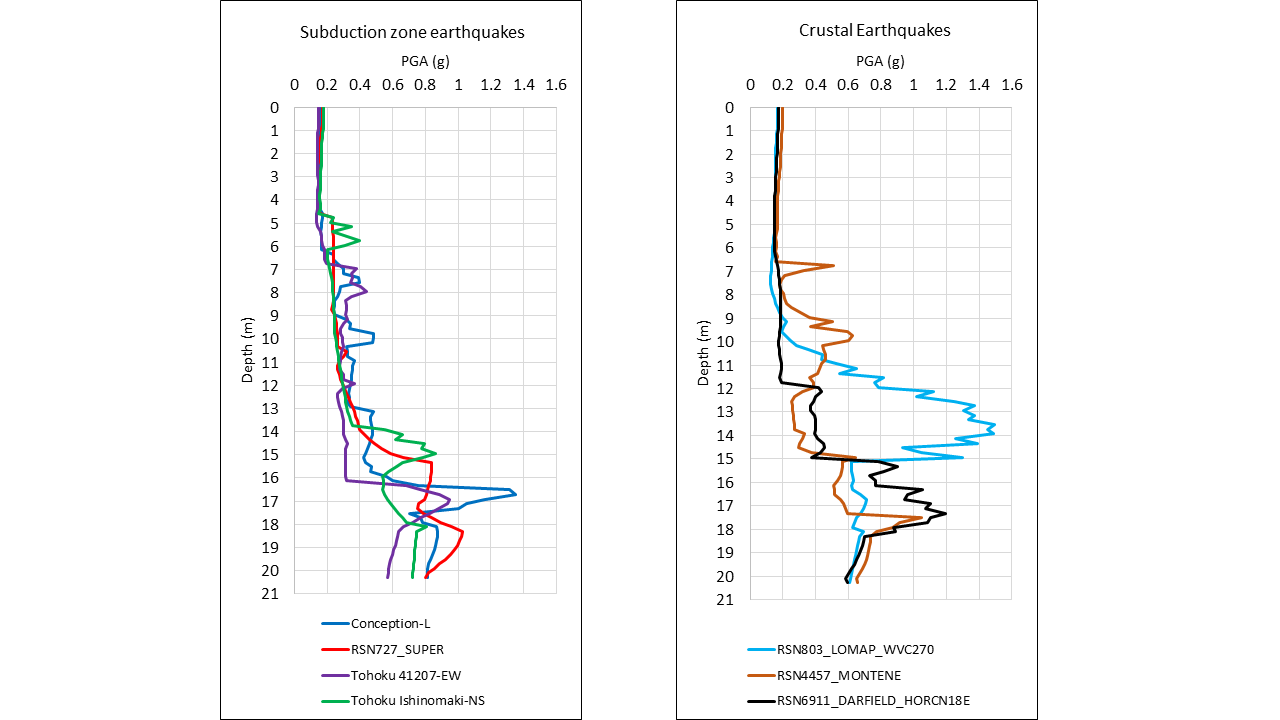
Figure 12. Peak Ground Acceleration.
Maximum Shear Strain
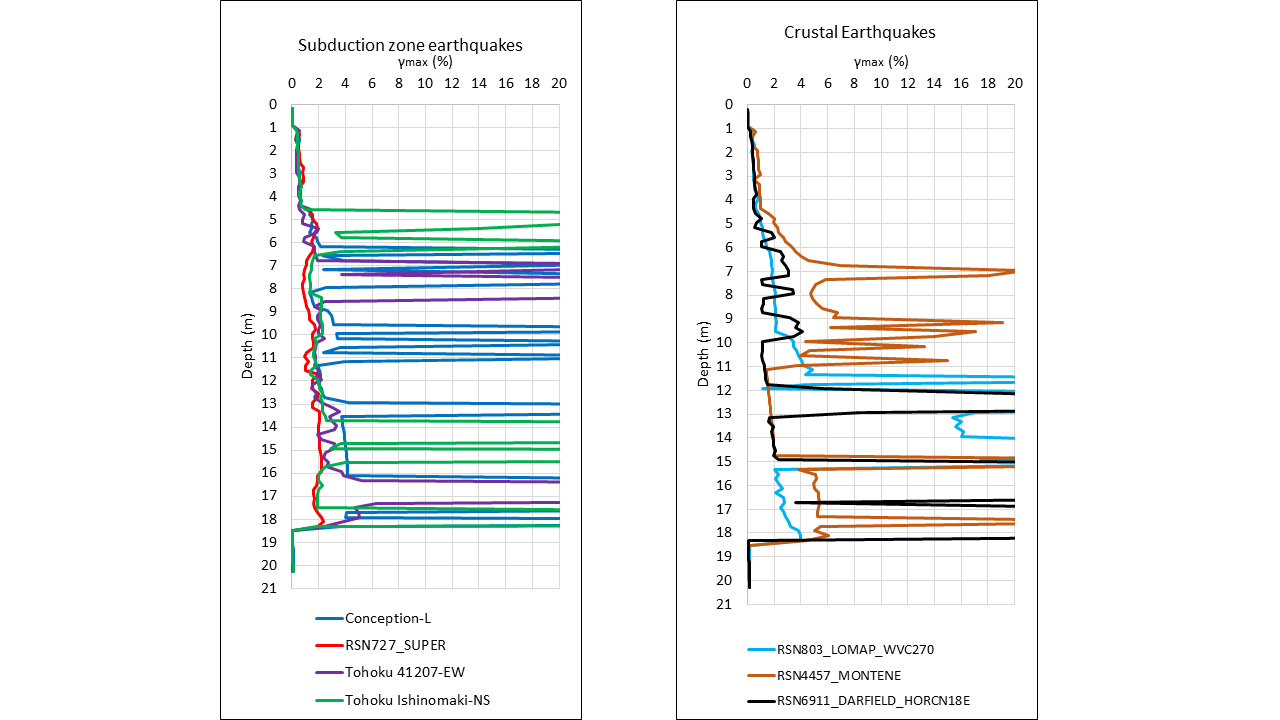
Figure 13. Maximum Shear Strain.
Maximum Displacement
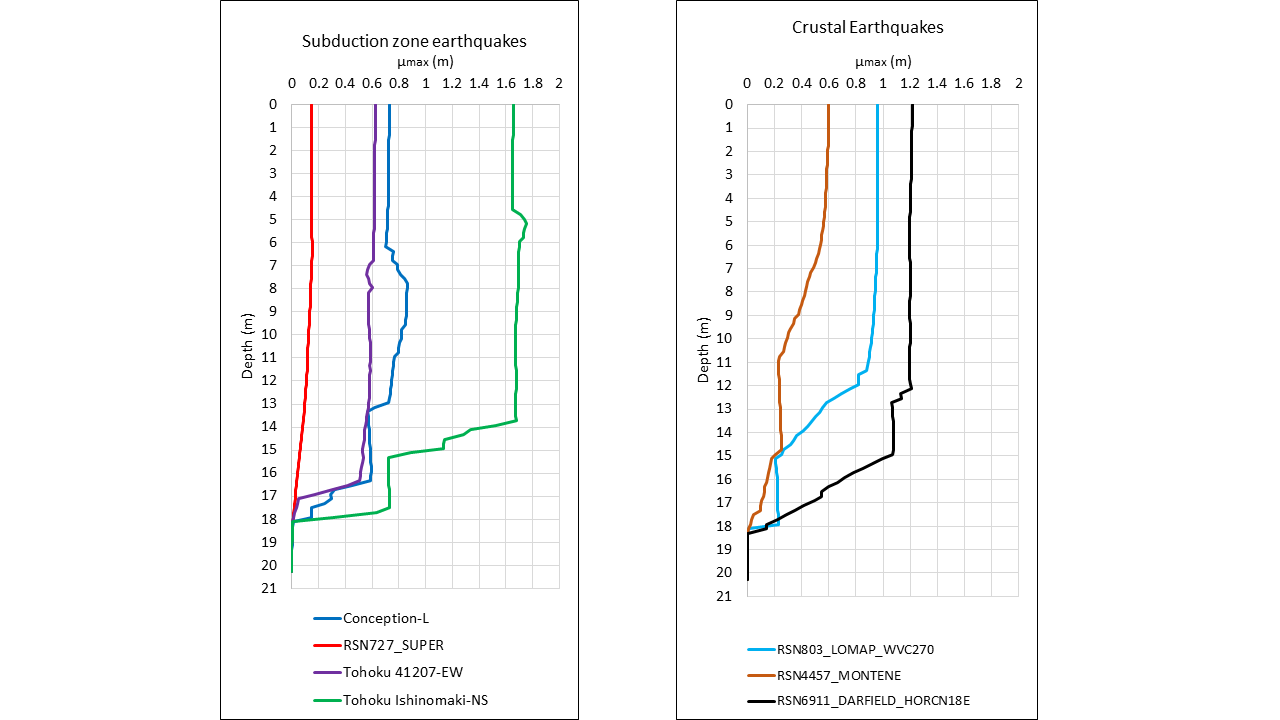
Figure 14. Maximum Displacement.
Maximum Excess Pore Pressure Ratio
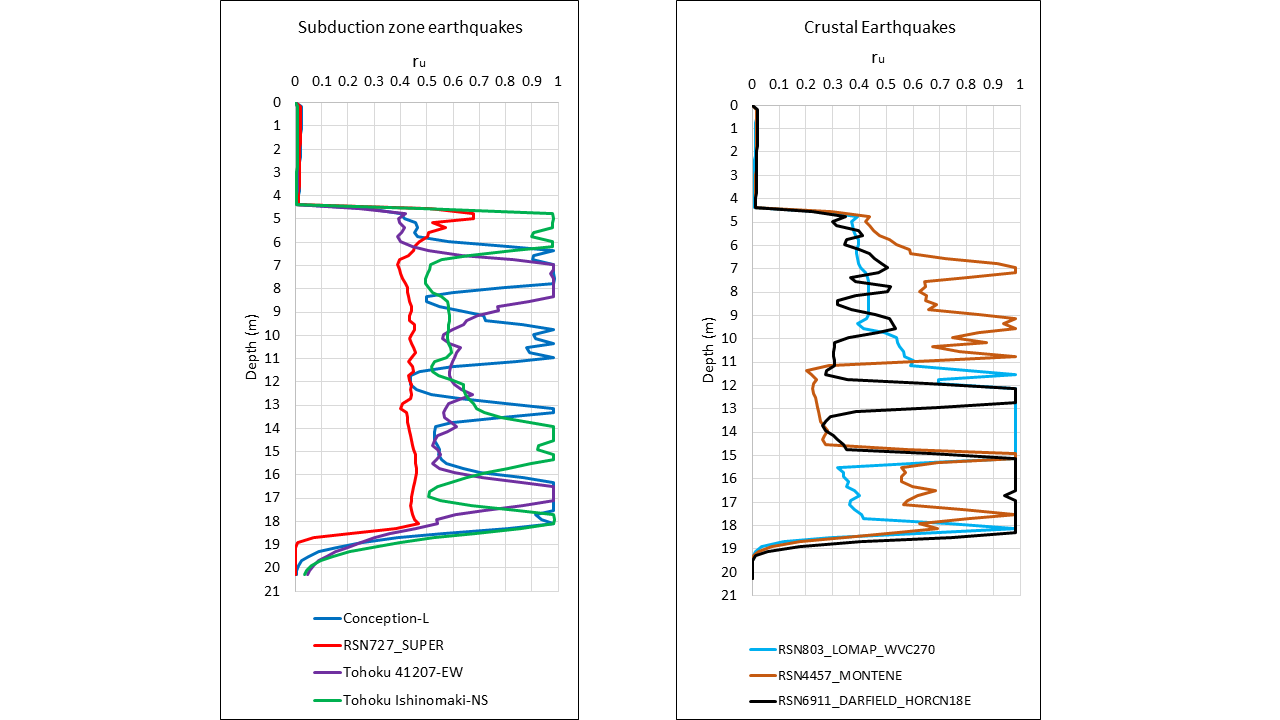
Figure 15. Maximum Excess Pore Pressure Ratio (ru ).
Ground Surface Response
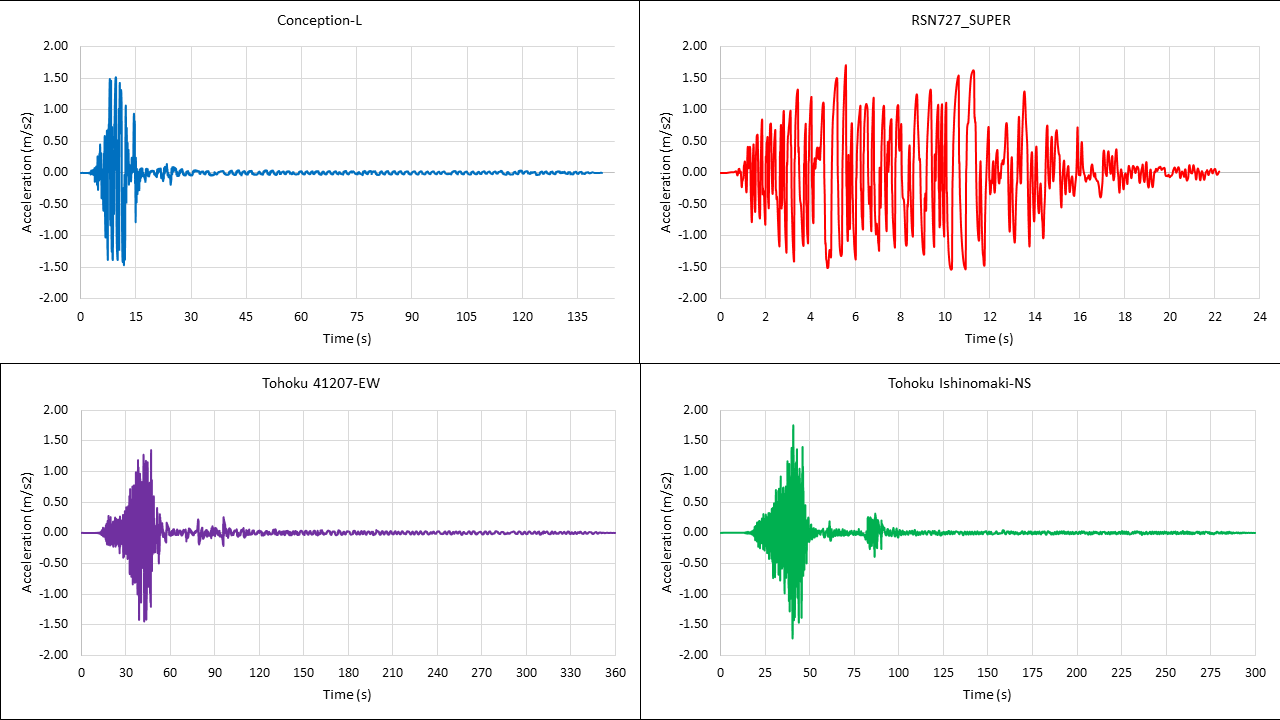
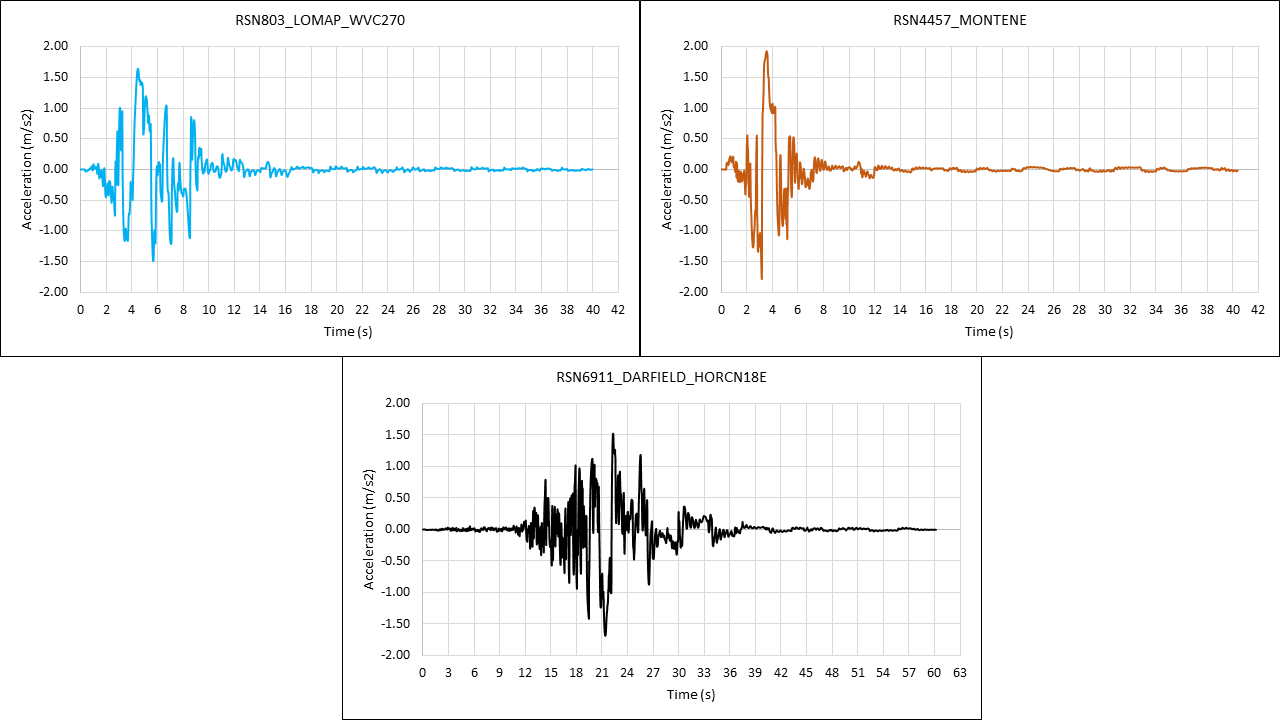
Figure 16.1. Acceleration (m/s2).
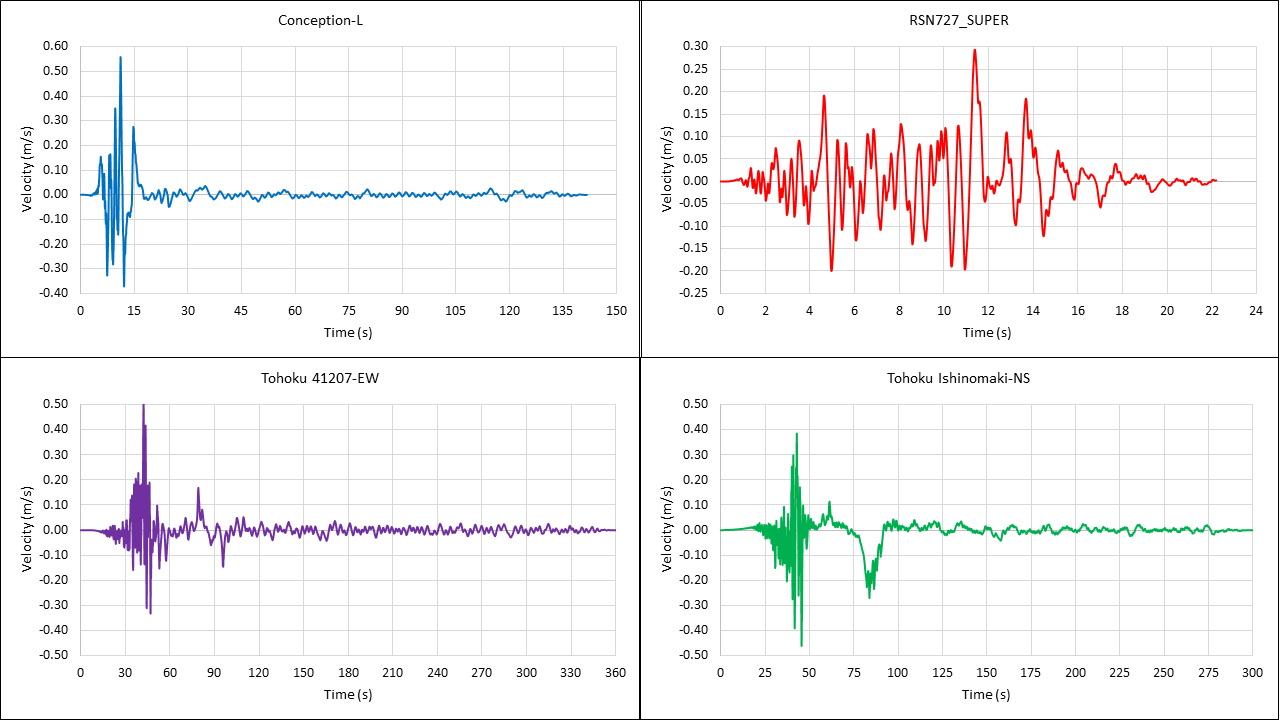
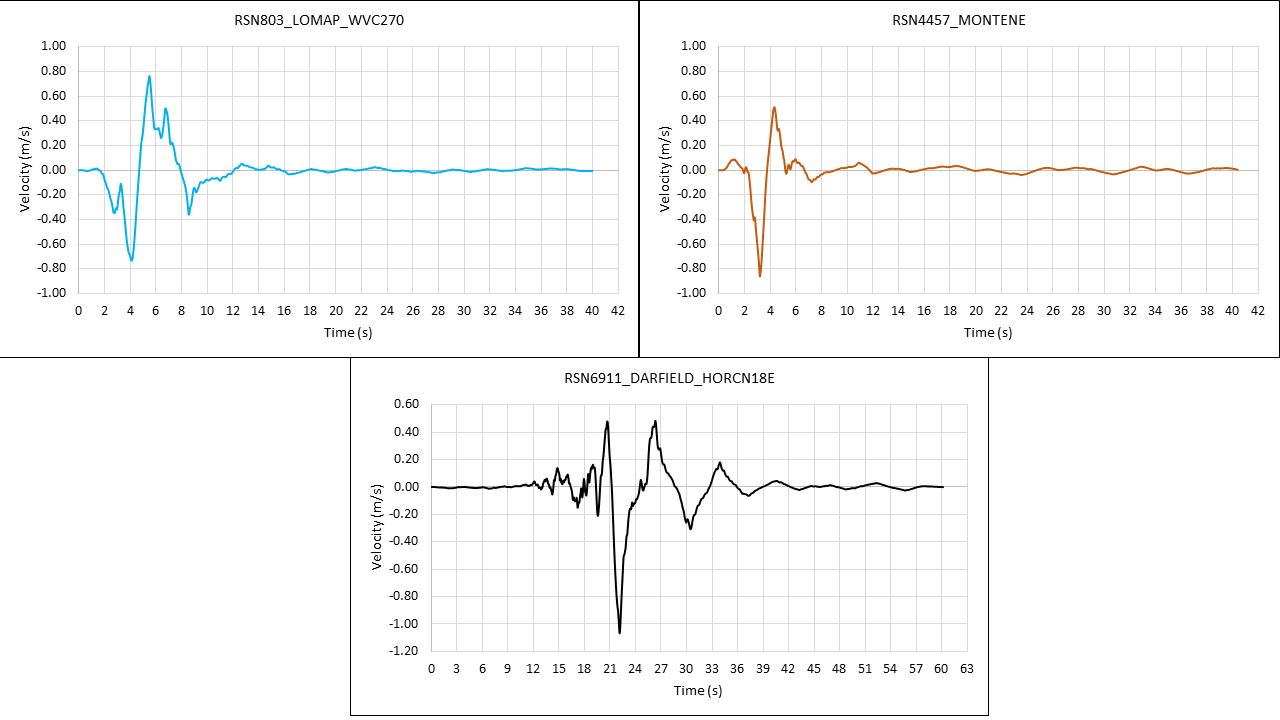
Figure 16.2. Velocity (m/s).
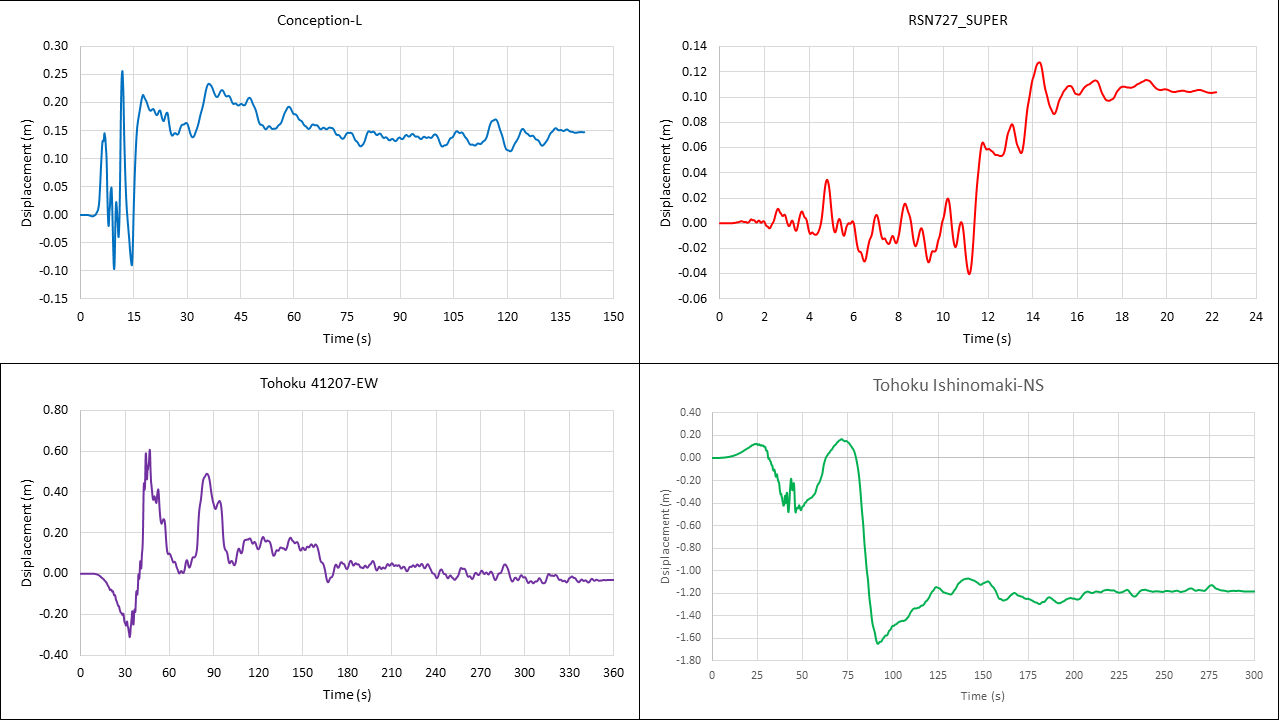
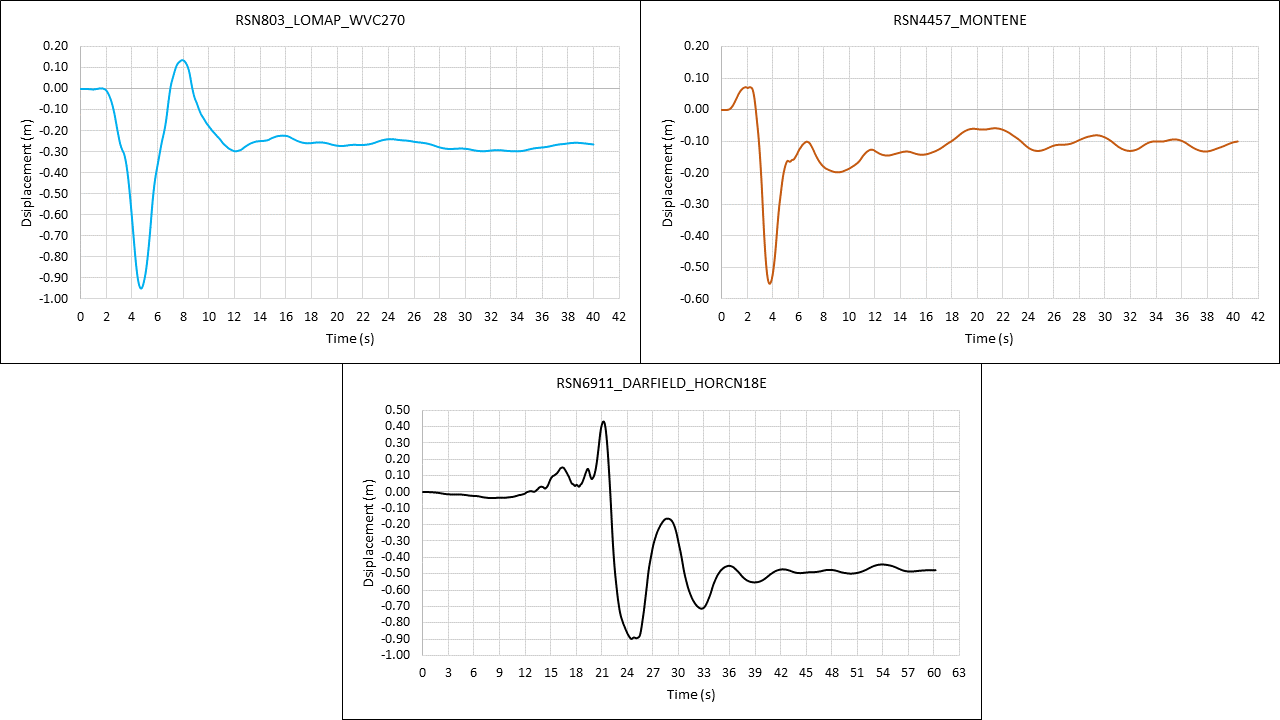
Figure 16.3. Displacement (m).
Figure 16. Ground Surface Response.
Rock Motion
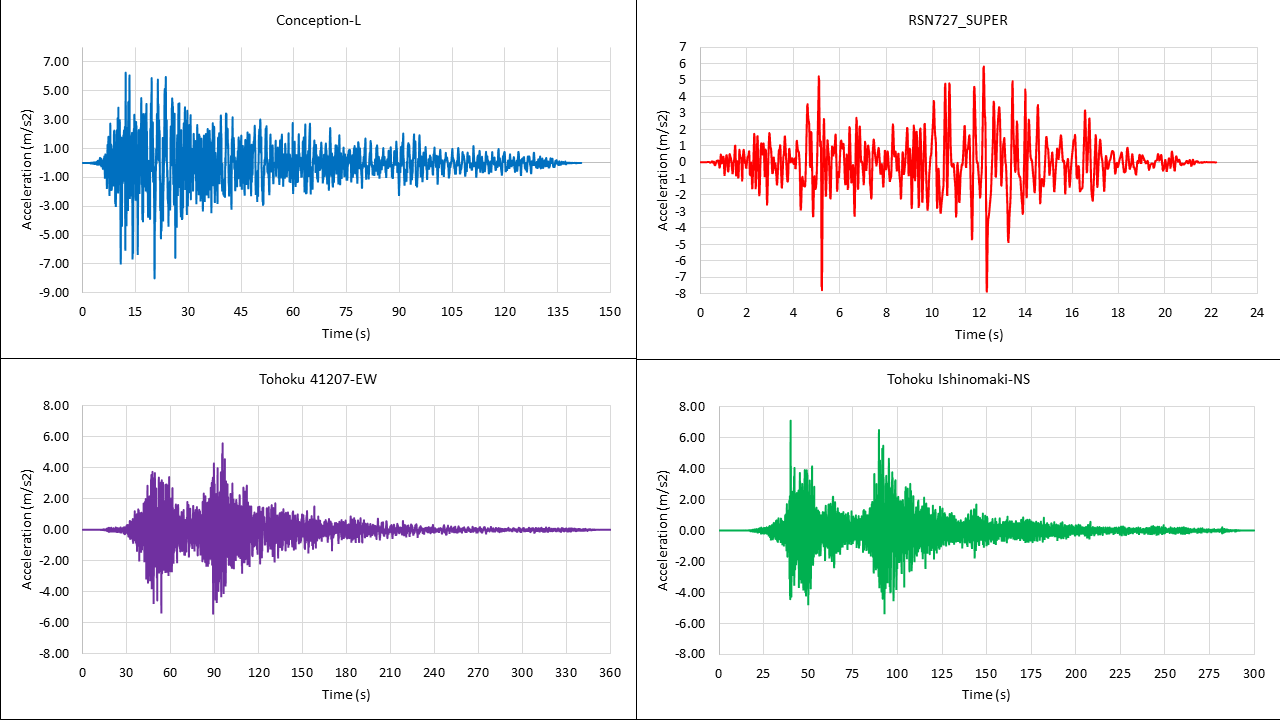
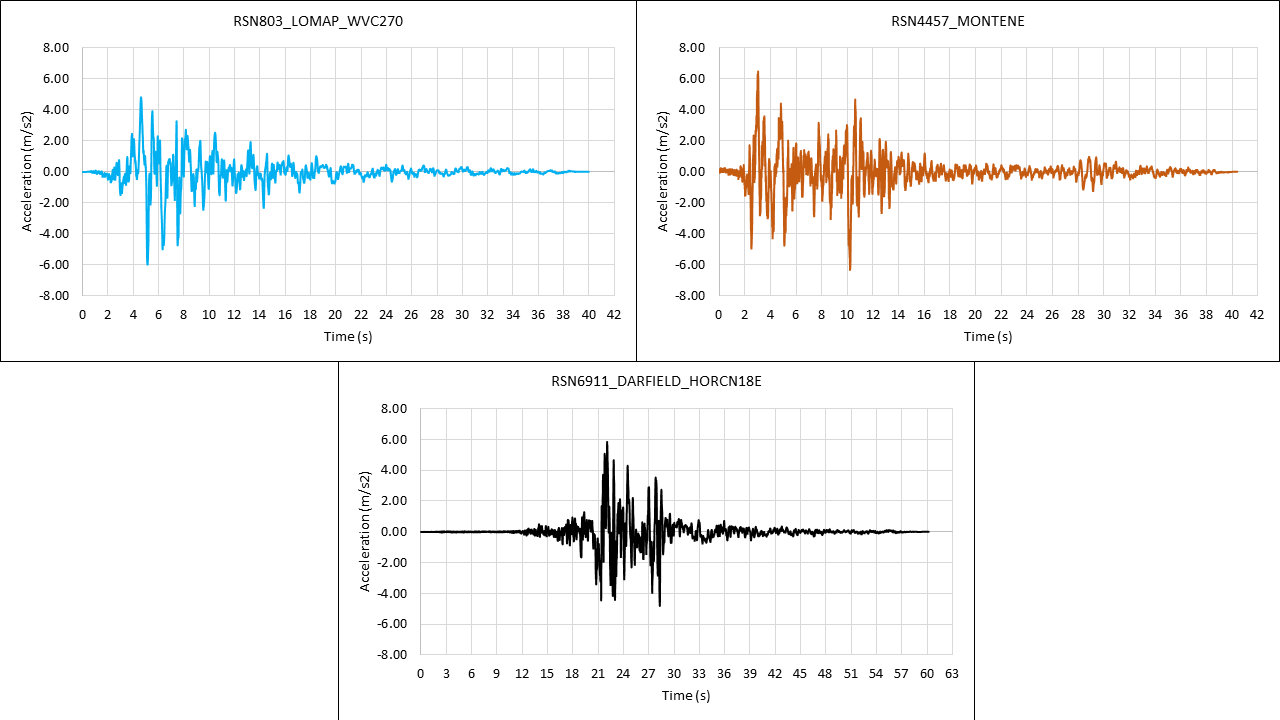
Figure 17.1. Acceleration (m/s2).
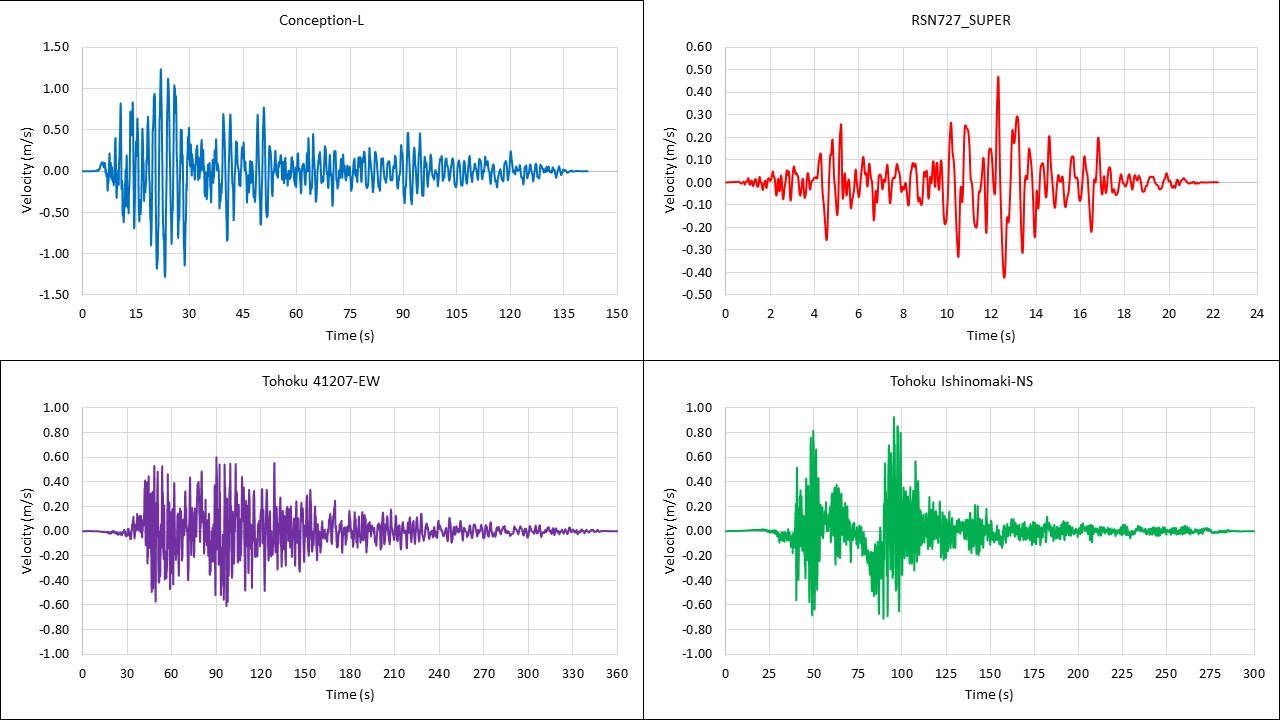
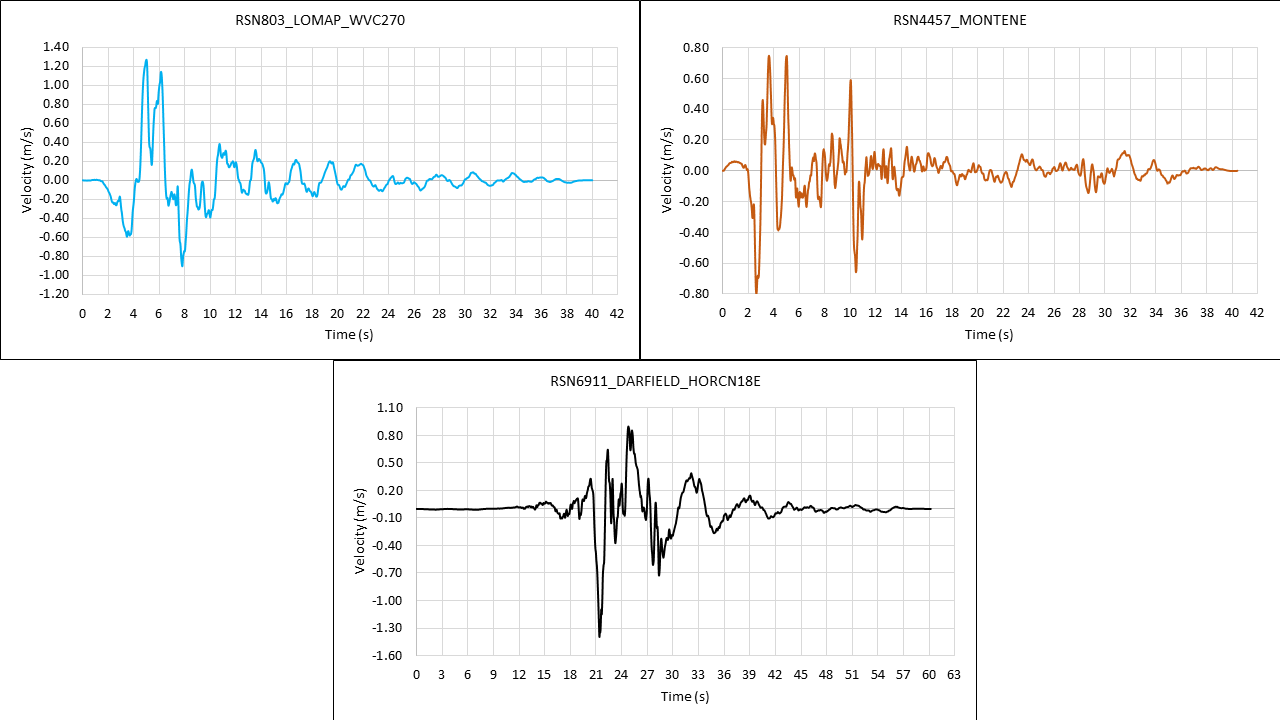
Figure 17.2. Velocity (m/s).
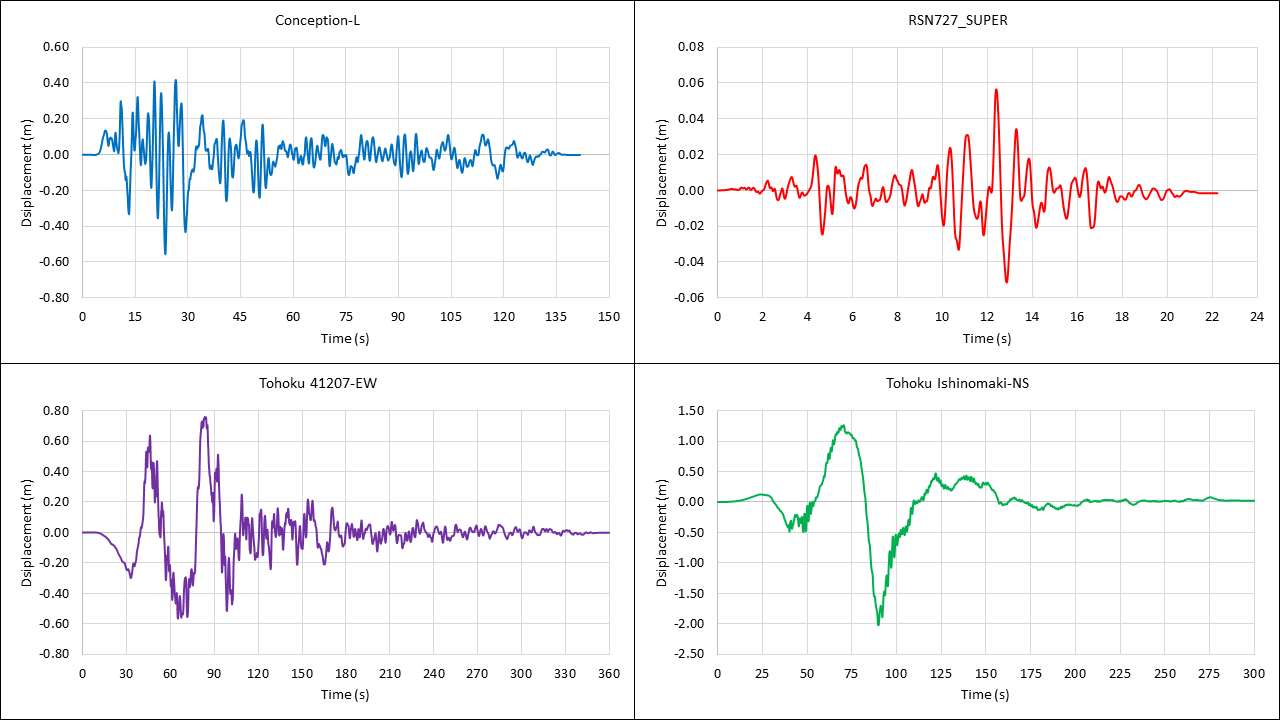
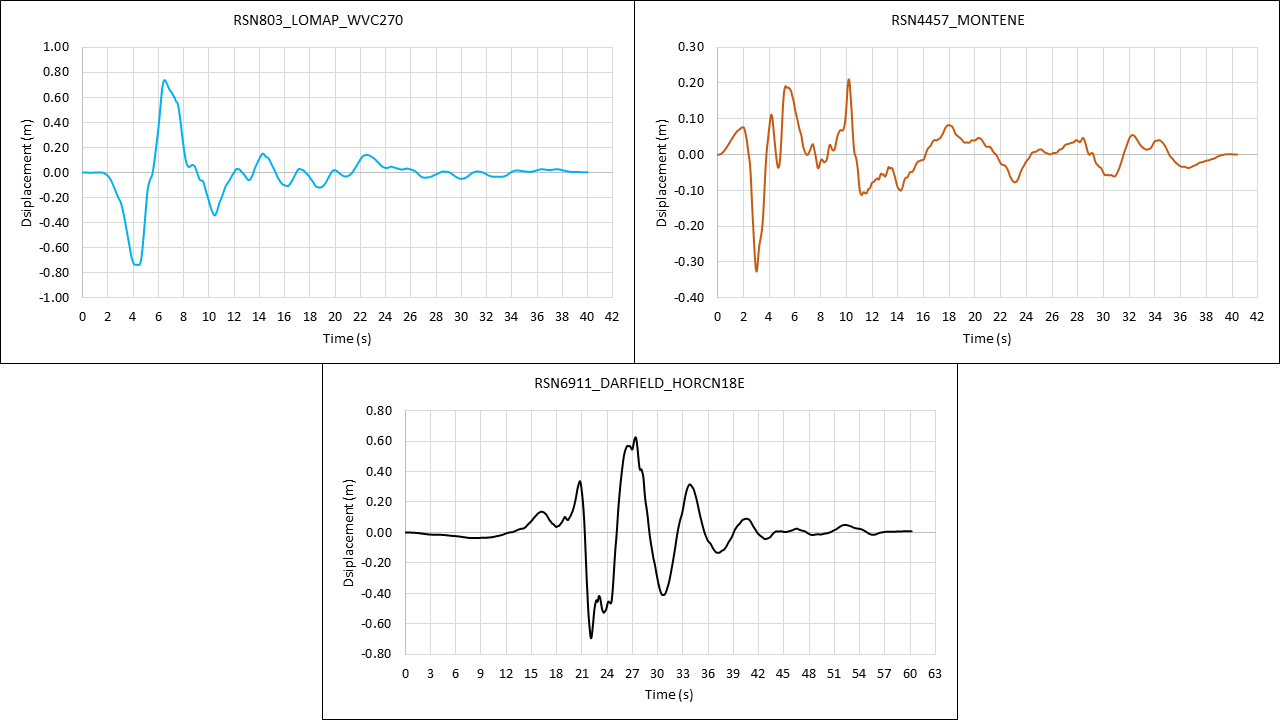
Figure 17.3. Displacement (m).
Figure 17. Input Rock Motion.
Remarks
Note
In the out_tcl folder, located on your computer (SimCenter -> s3hark -> out_tcl), you can find all the results of the analysis performed by Shark and plot them in the tool of your preference.
Warning
If you perform more than one analysis, make sure to copy the results before running the next analysis, as s3 hark will overwrite the new results on the old ones.